ShopDreamUp AI ArtDreamUp


 Fold it in half. And also cut two small sheets from any type of paper, I used kraft paper. Make an indent 5 mm and fold it.


Bronze
Hello, this plan guarantees you at least 50 new creations every month that you will have access to, for personal and commercial use, plus communication and suggestions from you, such as what you want to be posted in the future. Thank you
$100/month
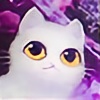
SPIRITS OF THE FIRST FROST AND SNOWFALL PENDANTS
These two collections both dedicated to winter time. Spirits of the first frost – it’s an impression when you see the first hoar on fallen leaves and you realize – autumn is over now, time for winter spirits. A bit sad fairytales about forest’s ghosts, frost and dreams. These pendants made from birch wood, real leaves, painted with oil paints.
The second collection, Snowfall pendants, is more joyful, like stories from Christmas cards. Little miracle on your neck. Just turn it over and watch a tiny snowfall. All pictures handpainted with oil paints.
Please subscribe my facebook page and you always will be informed abo
I made my own website
Hello, friends!
I have a great news!
Last two weeks my boyfriend and I worked at my site and now LunarFerns.com finally working!
I'm announcing a new savannah collection!
The sale will be this Sunday 29th October 10 PM Moscow time (7 PM UTC/11 AM PST/2 PM EST ). You can check time here: http://goo.gl/1LoHbA
On this page, you may find all photos, prices, and information about pendants.
Important! Sometimes there are instances where two customers add one item in a cart same time and the first who paid will be an owner. Sorry for this inconvenience!
Usually, sales finish very fast, so if you find here a pendant you want to
Giveaway!
Spring giveaway!
Sakura unicorn hand painted agate pendant
You can win it absolutely for free! Join giveaway in my
>>> Facebook <<<
Please subscribe my facebook page and you always will be informed about all sales and items!
https://www.facebook.com/LunarFerns/
Etsy shop Facebook Instagram Tumblr
Free Easter greeting card
Hello friends! ^_^
There are only a few days left until the Easter and I want to make a little gift for you! This is a free printable greeting card
Just dowlpoad this file, print on A4 paper, cut if you paper are bigger than file size and fold in half. Done! If you like it - share with your friends
Download here: http://bit.ly/2obBs7X
Free for personal use.
Based on my bunnies from sticker set: http://etsy.me/2p2NtAH
And also, my mom have a DeviantArt account now! Welcome to her gallery! ~HappyGlassJewelryArt (https://www.deviantart.com/happyglassjewelryart)
Last her work - koi fish pendants
Please subscribe my facebook page and you always will be informed about all sales a
© 2017 - 2024 LunarFerns
Comments2
Join the community to add your comment. Already a deviant? Log In
I love that fern @_@